Why Listing Photos Make or Break Your Sale
When someone browses second hand furniture online they make a decision in under three seconds. They see your photo and either stop scrolling or keep going.
A bad photo of a great piece will lose to a great photo of an average piece every single time.
Research consistently shows that visual appearance is the key factor in purchasing decisions for online shoppers, with 93% of consumers citing it as decisive.
We have seen listings on Zirkly where the exact same piece went from zero offers to a confirmed sale in four hours after one simple photo change. Same price. Same description. Different photo.
That is how much listing photos matter when selling used furniture in Melbourne.
Rule 1: Use Natural Light Only — Never Flash
If you take one thing from this guide make it this.
Natural light is the single biggest difference between a listing photo that gets offers and one that gets ignored. When you photograph secondhand furniture to sell, always move the piece near a window and turn off every artificial light in the room.
Here is why natural light works so well when photographing pre-loved furniture to sell:
- It shows the true colour of the piece
- It reveals texture such as wood grain, fabric weave and leather finish
- It makes everything look warmer and more inviting
Best time to shoot: Morning or late afternoon gives the softest and most flattering light.
Never use flash. Flash kills texture, washes out colour and makes even a beautiful piece of pre-owned furniture look flat and cheap.
Whether you are photographing a used sofa in Carnegie or a pre-loved dining table in Glen Waverley, the natural light rule applies everywhere.
Rule 2: Clear the Background Completely
A cluttered background does two things.
First, it distracts the buyer.
Second, it makes the piece look less valuable.
The fix is simple. Push the piece against a plain white or neutral wall. Remove everything around it including other furniture, boxes and household items.
Leave nothing in the frame except the piece you are selling.
One piece. One wall. Nothing else.
This takes two minutes and makes a dramatic difference to how quickly your second hand furniture sells.
Rule 3: Shoot From the Right Angle
Most people photograph used furniture from wherever they happen to be standing. That is almost never the right angle.
The front-on shot is the most important. Get down to eye level and take the photo so the sides of the furniture are totally vertical.
Here is the complete angle formula:
Sofas and Low Seating
Shoot at eye level. Shooting from above makes a sofa look small and flat.
Tables, Sideboards and Storage Furniture
Shoot from a 45-degree angle. This shows width, depth and height in one shot.
Rugs and Flat Items
Shoot directly from above. This is the only angle that accurately shows the full pattern and size.
Always take three shots minimum:
- Full piece from the front at eye level
- 45-degree angle shot
- Close-up of any damage or wear
The Photo Most Melbourne Sellers Skip — But Absolutely Should Not
Take a close-up photo of any scratches, marks or wear on the piece.
This sounds counterintuitive.
Why highlight the flaws when you are trying to sell pre-loved furniture?
Because buyers who can see the damage trust you.
Listings with honest damage photos get more offers and get them faster than listings that try to conceal imperfections.
Melbourne buyers appreciate honesty and they respond to it with faster decisions and fewer questions.
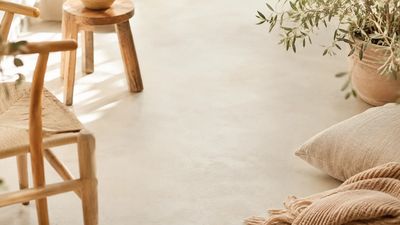
How to Take a Lifestyle Shot That Converts Browsers Into Buyers
Once you have your three standard shots, take one more.
Place the piece in a styled corner of your home.
Add a plant, a candle or a stack of books.
Nothing elaborate.
The goal is helping buyers imagine the furniture in their own home.
That visualisation is what converts a casual browser into a serious buyer.
How to Edit Your Furniture Photos Free on Your Phone
You do not need expensive editing software.
Step 1 — Crop Tightly
The piece of furniture should fill at least 80% of the frame.
Step 2 — Increase Brightness Slightly
Increase brightness by 10–15%.
Step 3 — Increase Contrast Slightly
Increase contrast by around 10%.
Step 4 — Straighten the Image
Ensure all vertical lines are perfectly straight.
Free apps worth using:
- Snapseed
- Lightroom Mobile
- Apple Photos
Do not over-edit.
The goal is to show the piece accurately and attractively.
Common Mistakes Melbourne Sellers Make With Listing Photos
1. Using Flash Indoors
Flash flattens everything and kills texture.
2. Shooting From Too Far Away
The furniture looks tiny and buyers cannot see detail.
3. Including Too Much of the Room
The buyer wants to see the furniture, not your living room.
4. Not Cleaning the Piece Before Shooting
Dust and fingerprints reduce perceived value.
5. Only Taking One Photo
Three photos minimum. Five is better.
6. Shooting in a Dark Room
Dark photos signal neglect.
7. Not Including a Damage Close-Up
Showing damage builds trust. Hiding it destroys trust.
Complete Checklist Before You List Your Furniture Online
- Shot in natural light with no flash
- Background completely clear
- Minimum three angles
- Close-up of any damage included
- Photo is sharp and in focus
- Furniture fills most of the frame
- Basic edits completed
- Furniture is clean
- Optional lifestyle shot included
List Your Pre-Loved Furniture Free on Zirkly Today
Zirkly is Melbourne's free secondhand furniture marketplace built specifically for local furniture buying and selling.
Your entire listing can be created automatically from just one photo.
No typing required. No guessing on price.
Just one great photo and your listing can be live in under 30 seconds.